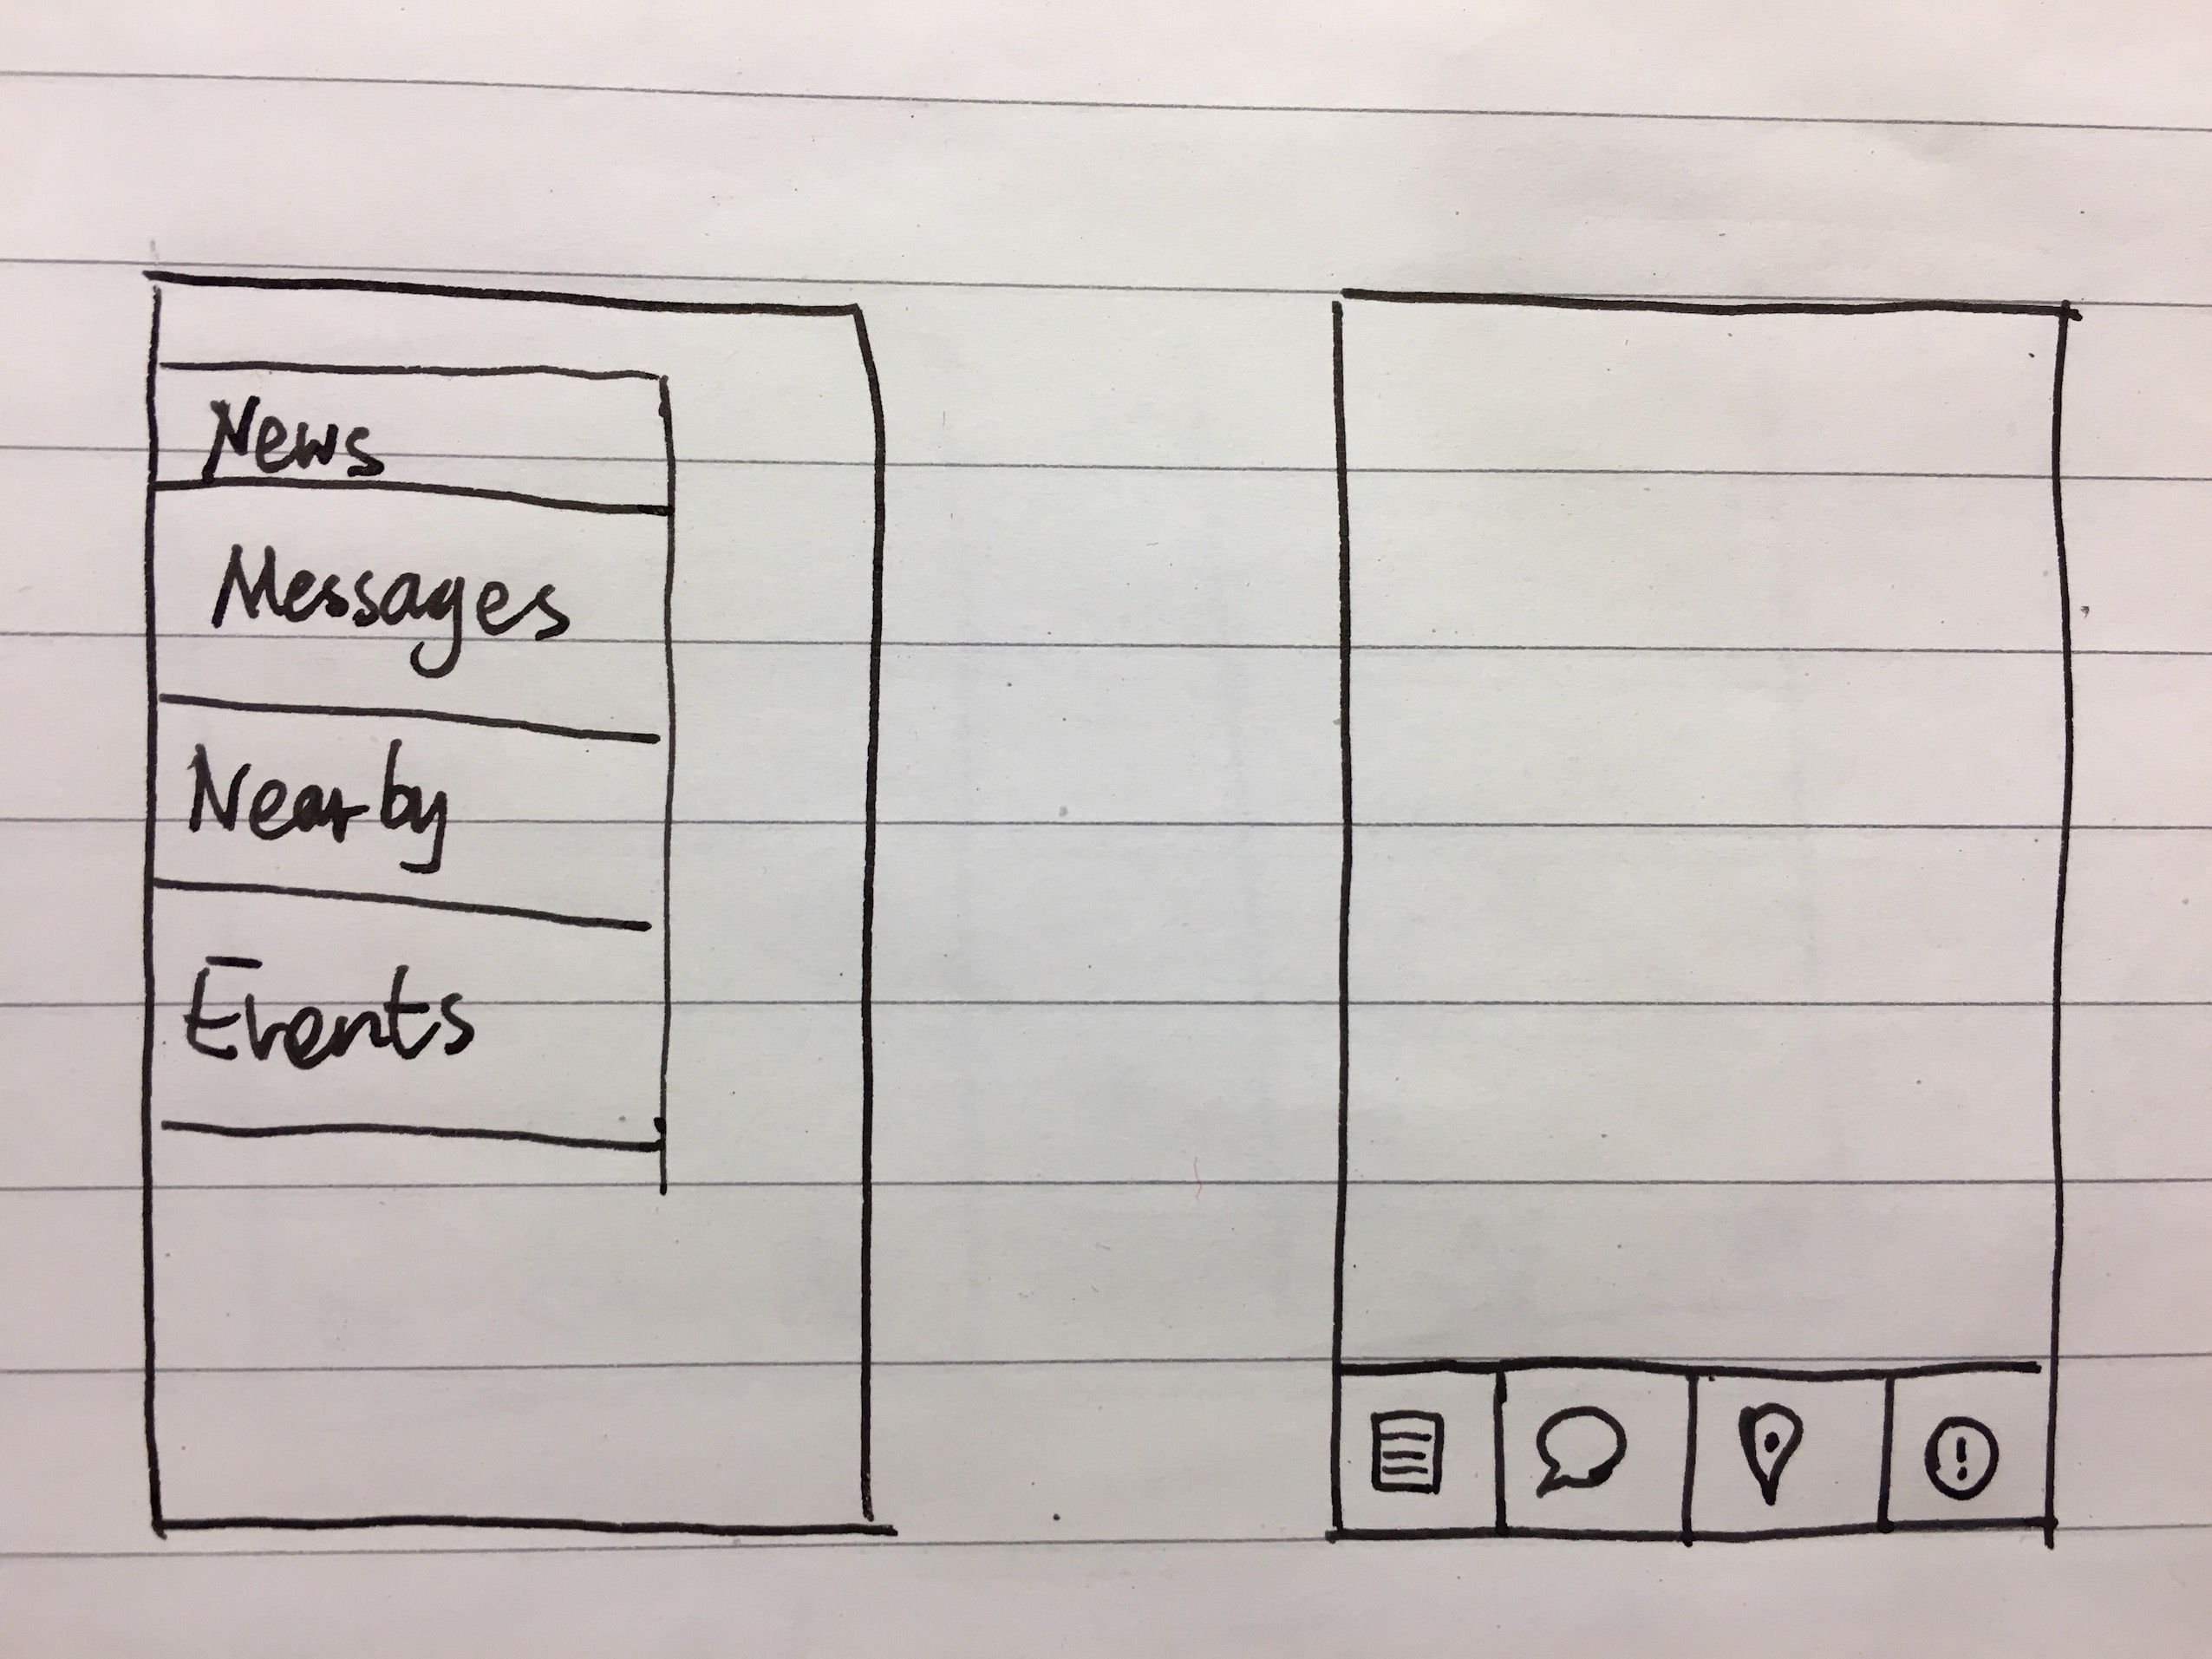
Material design 闲扯几句,这几年流行个扁平化风格,不管是ppt设计还是前端,大家都在玩这个,做UI当然也要凑个热闹,但是为什么要追求这个风潮还是要考究的。Google还提出了一个质感设计 的概念,没事er时候看两眼。anyway,简单优雅的UI提高的不止是视线所能及的好看,更多的是交互的便利性,按键的有效性,架构的优雅程序。navigation bar的角度来说,底端停驻的navigation bar,远比侧面划出的navigation bar更高效。
在安卓开发里面,想要实现底部的navigation bar这一功能,需要借助fragment来实现。
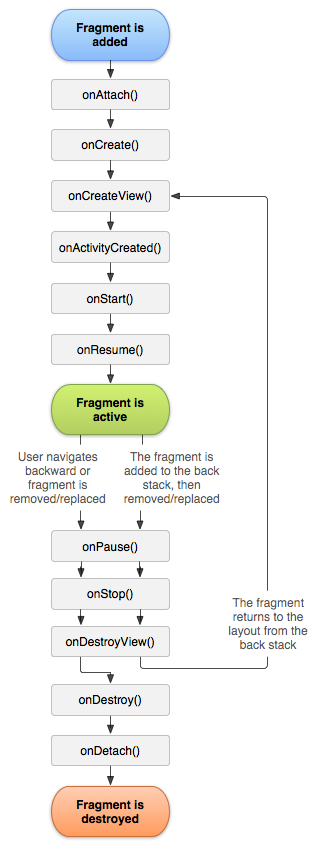
FragmentFragment有点类似于小型的activity,但是Fragment只能存在于activity内部,受activity生命周期的影响,但它也有自己的生命周期。Google引入Fragment主要是为了适应更灵活的UI设计,主要服务于平板电脑此类大尺寸的显示设备。
实例演示 bottomNavigationBar+Fragment对页面控制,只要通过5个步骤实现
gradle添加依赖添加menu选项栏
在主要的layout XML文件中,为fragment在添加container
在main.java文件中添加控制fragment的listener
添加fragment本身java文件和XML布局文件
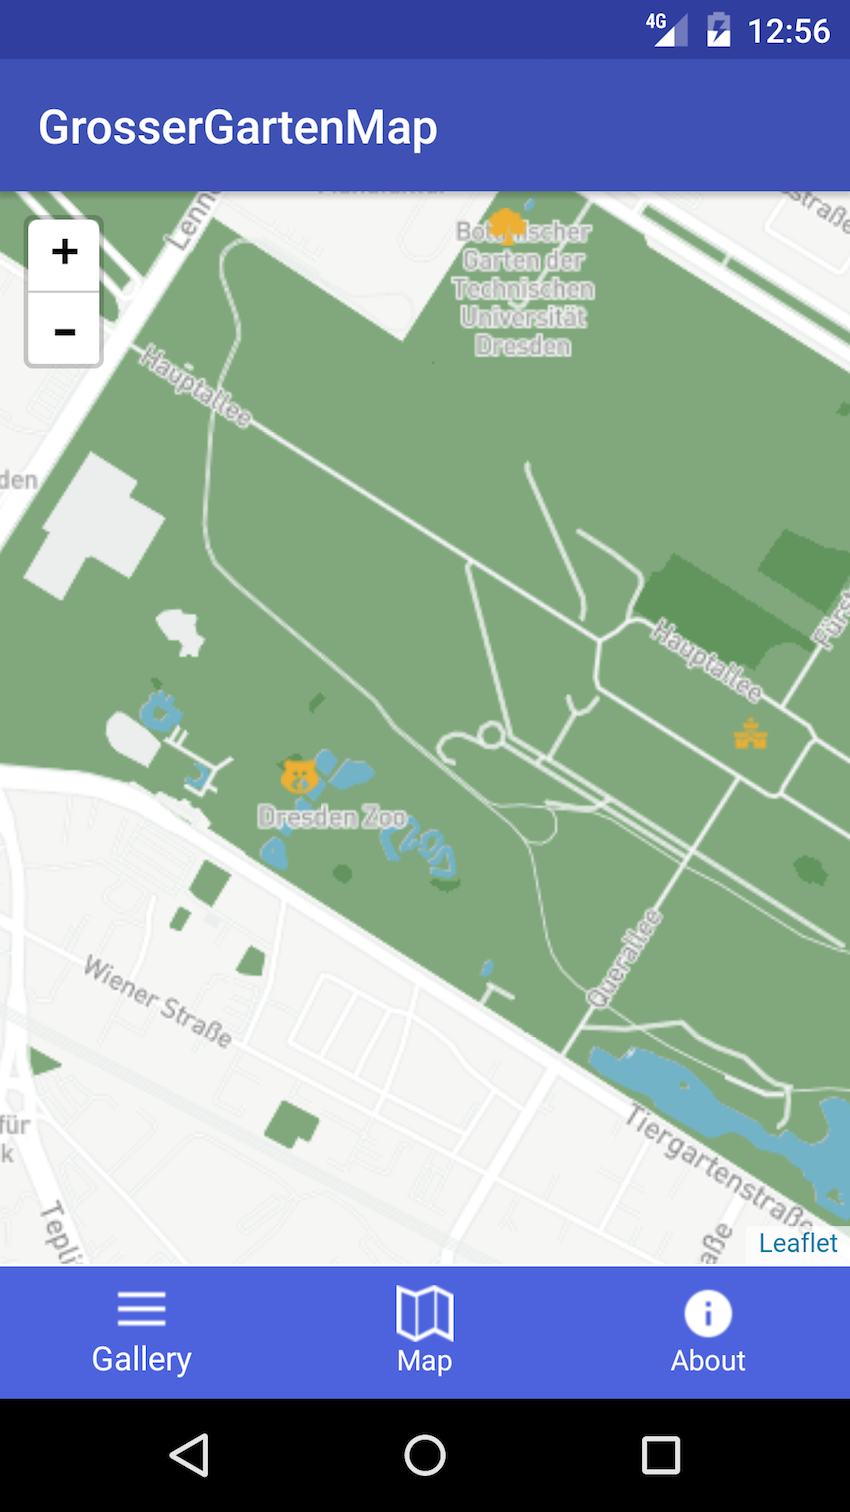
最后实现的布局如下:
gradle添加依赖1 2 3 4 5 compile 'com.android.support:recyclerview-v7:25.1.0' compile 'com.android.support:support-v4:25.1.0' compile 'com.android.support:design:25.1.0'
先右键app添加menu资源文件
1 2 3 4 5 6 7 8 9 10 11 12 13 14 15 16 17 18 19 <?xml version="1.0" encoding="utf-8"?> <menu xmlns:android="http://schemas.android.com/apk/res/android"> <item android:id="@+id/action_gallery" android:enabled="true" android:icon="@drawable/ic_gallery_white_24dp" android:title="@string/text_gallery" /> <item android:id="@+id/action_map" android:enabled="true" android:icon="@drawable/ic_map_on_white_24dp" android:title="@string/text_map"/> <item android:id="@+id/action_about" android:enabled="true" android:icon="@drawable/ic_about_white_24dp" android:title="@string/text_about"/> </menu>
main.XML文件 1 2 3 4 5 6 7 8 9 10 11 12 13 14 15 16 17 18 19 20 21 22 23 24 25 26 <?xml version="1.0" encoding="utf-8" ?> <LinearLayout xmlns:android="http://schemas.android.com/apk/res/android" xmlns:tools="http://schemas.android.com/tools" xmlns:app="http://schemas.android.com/apk/res-auto" android:layout_width="match_parent" android:layout_height="match_parent" android:orientation="vertical" tools:context="com.example.myapplication.MainActivity" > <!-- This is container --> <FrameLayout android:layout_width="match_parent" android:id="@+id/frameLayout" android:layout_height="0dp" android:layout_weight="1" /> <!-- This is the Bottom Bavigation Bar --> <android.support.design.widget.BottomNavigationView android:id="@+id/navigation" android:layout_width="match_parent" android:layout_height="wrap_content" android:layout_gravity="start" app:menu="@menu/menu" app:itemBackground="@color/colorPrimaryLight" app:itemIconTint="@color/colorIcon" app:itemTextColor="@color/colorText" /> </LinearLayout>
mainjava文件 在包名(第一行)下添加如下代码,需要按照提示添加库
1 2 3 4 5 6 7 8 9 10 11 12 13 14 15 16 17 18 19 20 21 22 23 24 25 26 27 28 29 30 31 32 33 34 35 36 37 38 39 40 41 42 43 44 45 public class MainActivity extends AppCompatActivity @Override protected void onCreate (Bundle savedInstanceState) super .onCreate(savedInstanceState); setContentView(R.layout.activity_main); FragmentTransaction fragmentTransaction = getSupportFragmentManager().beginTransaction(); fragmentTransaction.replace(R.id.frameLayout,MapFragment.newInstance()); fragmentTransaction.commit(); BottomNavigationView bottomNavigationView = (BottomNavigationView) findViewById(R.id.navigation); bottomNavigationView.setOnNavigationItemSelectedListener(new BottomNavigationView.OnNavigationItemSelectedListener() { @Override public boolean onNavigationItemSelected (@NonNull MenuItem item) Fragment fragment = null ; switch (item.getItemId()) { case R.id.action_map: fragment = MapFragment.newInstance(); System.out.println("here is main activity, map item selected" ); break ; case R.id.action_gallery: fragment = GalleryFragment.newInstance(); System.out.println("here is main activity, gallery item selected" ); break ; case R.id.action_about: fragment = AboutFragment.newInstance(); System.out.println("here is main activity, about item selected" ); break ; } if (fragment != null ) { FragmentTransaction fragmentTransaction = getSupportFragmentManager().beginTransaction(); fragmentTransaction.replace(R.id.frameLayout, fragment); fragmentTransaction.commit(); } return true ; } }); } }
FragmentTransaction是一个抽象类,提供了一些方法去控制fragment的变化。默认进入的是mainXML文件,这里用到replace方法把默认的布局改为启动MapFragment,后面也是同样的方法修改containner中的布局。switch语句监听用户点击menu的变化,当用户点击对应的menu选项,切换到对应的fragment当中。
fragment java文件 1 2 3 4 5 6 7 8 9 10 11 12 13 14 15 16 17 18 19 20 21 22 23 24 25 26 27 28 29 30 31 32 33 34 35 36 37 38 39 40 41 42 43 44 45 46 47 48 49 50 51 52 53 54 55 56 public class MapFragment extends Fragment private OnFragmentInteractionListener listener; public static MapFragment newInstance () return new MapFragment(); } @Override public void onCreate (Bundle savedInstanceState) super .onCreate(savedInstanceState); } @Override public View onCreateView (LayoutInflater inflater, ViewGroup container, Bundle savedInstanceState) View v=inflater.inflate(R.layout.fragment_map, container, false ); WebView mWebView = (WebView) v.findViewById(R.id.webview); mWebView.loadUrl("file:///android_asset/map.html" ); WebSettings webSettings = mWebView.getSettings(); webSettings.setJavaScriptEnabled(true ); mWebView.setWebViewClient(new WebViewClient()); return v; } @Override public void onAttach (Context context) super .onAttach(context); } @Override public void onDetach () super .onDetach(); listener = null ; } public interface OnFragmentInteractionListener public void onMapFragmentInteraction (String string) } }
代码中注释掉的是android studio中自动生成的onAttach方法,这里需要自己手动定义listener,否则会抛出错误如下:
1 2 MainActivity@2298f 3ca must implement OnFragmentInteractionListener at com.peterchappy.lab5.ContentFragmet.onAttach(ContentFragmet.java:83 )
这个listener设置主要是留作fragment之间的通信,本例中fragment没有通信的需要,不需要给onAttach方法设置listener。在stackoverflow中给出的方法是直接用另一段代码替换掉原来的onAttach方法。fragment中使用WebView。代码在OnCreate方法里实现,注释的比较清楚了。
Reference [1] Exploring the Android Design Support Library: Bottom Navigation View ERROR: must implement OnFragmentInteractionListener Bottom bar navigation with 3 fragments How do I implement OnFragmentInteractionListener? Using WebView in Fragment [duplicate]


